
Bed Stuy Kitchen Reno: Reclaiming the Parlor Floor
A reader writes in…Once we purchased our brownstone, we quickly realized that it didn’t have the most efficient layout. So after talking with architects and contractors and getting nowhere, we decided to use our own creative instincts. We decided to make the master bedroom the Kitchen. Instead of keeping the kitchen where it is typically…


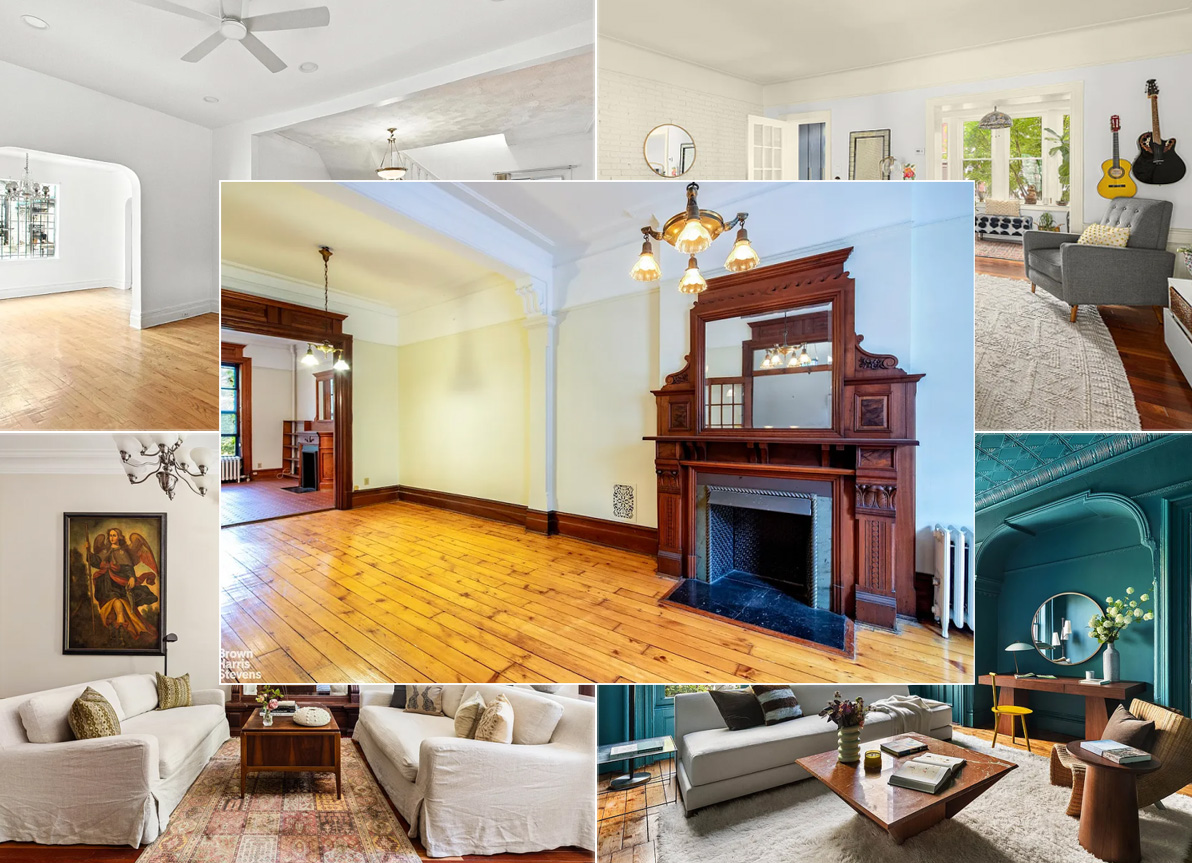
A reader writes in…Once we purchased our brownstone, we quickly realized that it didn’t have the most efficient layout. So after talking with architects and contractors and getting nowhere, we decided to use our own creative instincts. We decided to make the master bedroom the Kitchen. Instead of keeping the kitchen where it is typically found in similar brownstones, on the garden level, we wanted to be able to utilize the high ceilings on the parlor level and went for it. The room is located at the rear of the Parlor level and gets ample sunlight.
Our General Contractor was fairly enthusiastic, taking on the entire renovation as something of a pet project. Since we were gutting the garden level, it was simple enough to re-route pipes and gas lines. However, the room was covered in layers and layers of old, ugly paint. The bedroom (which was the house library originally) had the built-ins intact, but it was being used as a half bathroom/shower.
Trying to maintain all of the original detail, we meticulously stripped the paint, sanded the wood and stained it a rich mahogany color. We also moved the original mantle to the front parlor, which was missing its original one. In place of the mantle, we elected to put the stove. After getting several opinions from the brownstoner forum, we chose to go with Viking Appliances. All in all, we’re pretty satisfied with the final outcome, although we would have been better off using our contractor to do our cabinets. We chose to use a random fellow who promised us the world and undercut every other price quote we got from Home Depot and others. While his craftsmanship was great, his punctuality, ability to be reached by phone, and business savvy was much to be desired. At one point, he was out of pocket for two whole months, leaving our renovations at a stand-still.
Bed Stuy Kitchen Reno [Yahoo Photos]

Very Wide Range. It works out best if you can combine it with other renovation work. That said, excluding finishes, appliances, and the half bath, It was about $10,000. I got quotes from $8,000 to $40,000.
Hope this helps
i am considering doing the exact same project in my home, i.e., demolishing the garden floor kitchen and moving it to the rear parlor. If I may ask, what was the range of quotes you received from contractors for the work (labor, electrical, and plumbing) (not including the finishes, i.e., kitchen appliances, faucets, etc.)
Thanks
hi there – i know this is an old listing, but totally love your kitchen, and had a few questions for you. if you are still around, please hit me @ mjsaunde@hotmail.com. my name is jai.i saved this page forever so that when i was finally ready to renovate my kitchen i could use it as a point of reference. i was sad to see that the yahoo photos are no longer available. again it would be very much appreciated if you contact me. i live in bed-stuy as well. thanks!
^Whoops, I jumped the gun and assumed you were opening up the entire area. I should’ve read more closely. I apologize. Pocket doors are nice.
I just see so much of that where I live; opening up the walls between the dining room and kitchen and then installing a restaurant in a 1200 sq ft 1920s bungalow so that “everyone can chat with the cook”. To each his own I guess, but I hate to see a house permanently altered for what is likely, in the long run, just a passing fad.
That’s exactly what we wanted to create. The formal dining room is on the opposite side of the pocket doors. We actually close the doors when we have company over. 🙂
The workmanship and design looks good but I think having a restored parlor would’ve been stunning, but I realize most aren’t able to live with a small kitchen ala 1900. The idea of having a sitting room appeals to me. I have a 100 year old house in Houston and I’ve grown to love the idea of formal rooms and a small, utilitarian kitchen, separated by a door from the formal dining room. Eating becomes a separate act from preparation and that separation is nice, where dining can become more like a Japanese tea ceremony than having pizza in Joe’s apartment.
Is it Citristrip? Thanks so much for all the great info!
I never saw the kitchen you referred to in Clinton Hills. If I say anything of value it is NEVER EVER Use peel away. it is a complete Night mare. The process we came up with was to use a heat gun first. Then use a chemical peel. (the name slips me now, but its called Citrus something or other. Found at any home depot. And it smells great and works wonders) I would then simply wipe after letting it sit for 24 hours.
If you do it yourself, you’ll be astounished at the ease.
Although, as a caveat, I think it will depend on the kind of paint you’re stripping.
How was the paint stripped – with chemicals (peel away, etc.) or with heat gun? I’m thinking of tackling the project myself – and doing it little by little over several months so I don’t get overwhelmed.