
Brownstone Boys: Top 5 Hacks for an Inexpensive Kitchen Renovation
We managed to put together the look we wanted on a much lower budget than anyone said we needed.

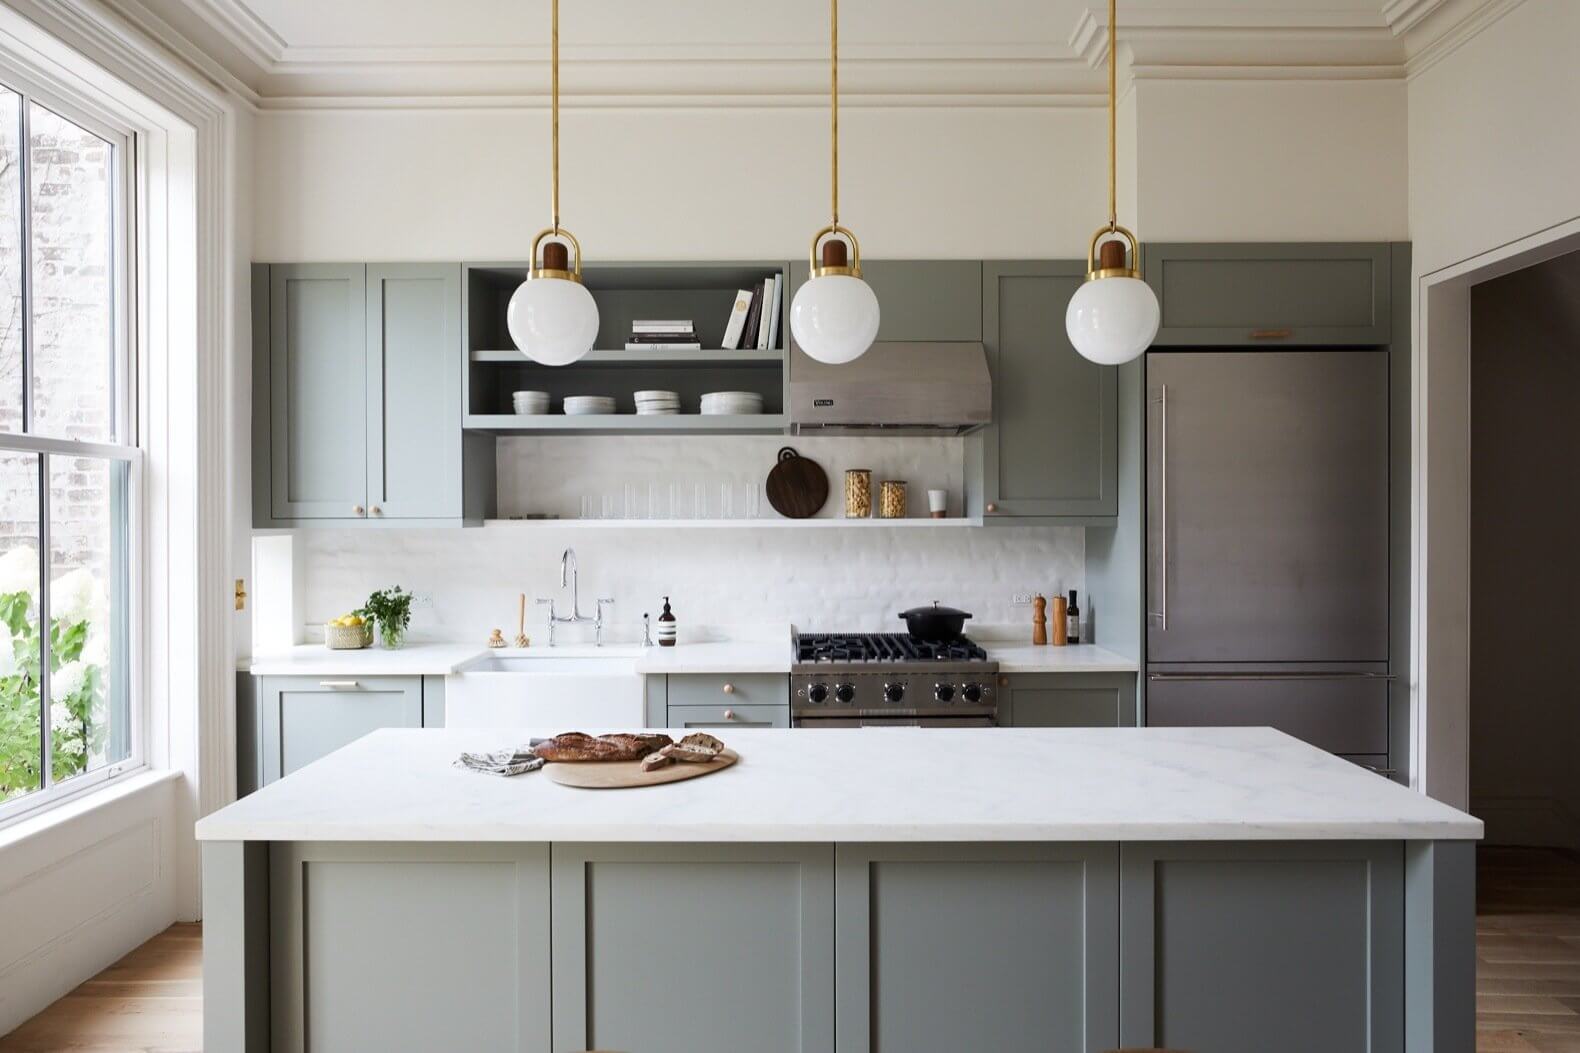
We assembled our pendants ourselves and saved hundreds of dollars. Photo by David Sauerhoff
Editor’s note: Welcome to the 58th installment of Brownstone Boys Reno, a reader renovation diary about renovating a brownstone in Bed Stuy. See the first one here. They also blog at www.thebrownstoneboys.com.
Our budget was maxed out just on the construction expense for our renovation so we had to get creative when buying finishes. We managed to put together the look that we wanted on a much lower budget than anyone said we needed. The kitchen was an area where were able to save a lot so we thought we would share our top five inexpensive kitchen reno hacks.
Let Inspiration Be Your Guide
Having a designer was definitely not in our budget (although we did have designer friends stop by for some friendly advice along the way). We found a kitchen design early on that we loved and planed to take a lot of inspiration from. You might have a few saved on Pinterest already; choose one or a few! No doubt your inspiration picture will be a kitchen with more expensive finishes. For instance, we loved the exact pendants in our inspiration picture, so we researched and found them. Unfortunately, we needed three and at $1,200 each they were way out of our budget (more about that below). We set out to put together a similar look and feel at a much lower cost. We did all of the design ourselves and felt confident with our inspiration photo as a guide.
DIY the Lighting
As we mentioned above the pendants in our kitchen inspiration photo were out of budget and we just didn’t see anything that we liked in our price range. Everything seemed a little too generic and we wanted something a bit more unique. So we decided to make our own pendants from parts we bought from a lighting parts wholesaler. If you’ve never wired a light before, you’re not the only one. We hadn’t either, but there is a wealth of knowledge online and we were able to get it done. We love the way it turned out. The other lighting upgrade we were able to DIY was our under cabinet led lighting. It was inexpensive and easy to install.
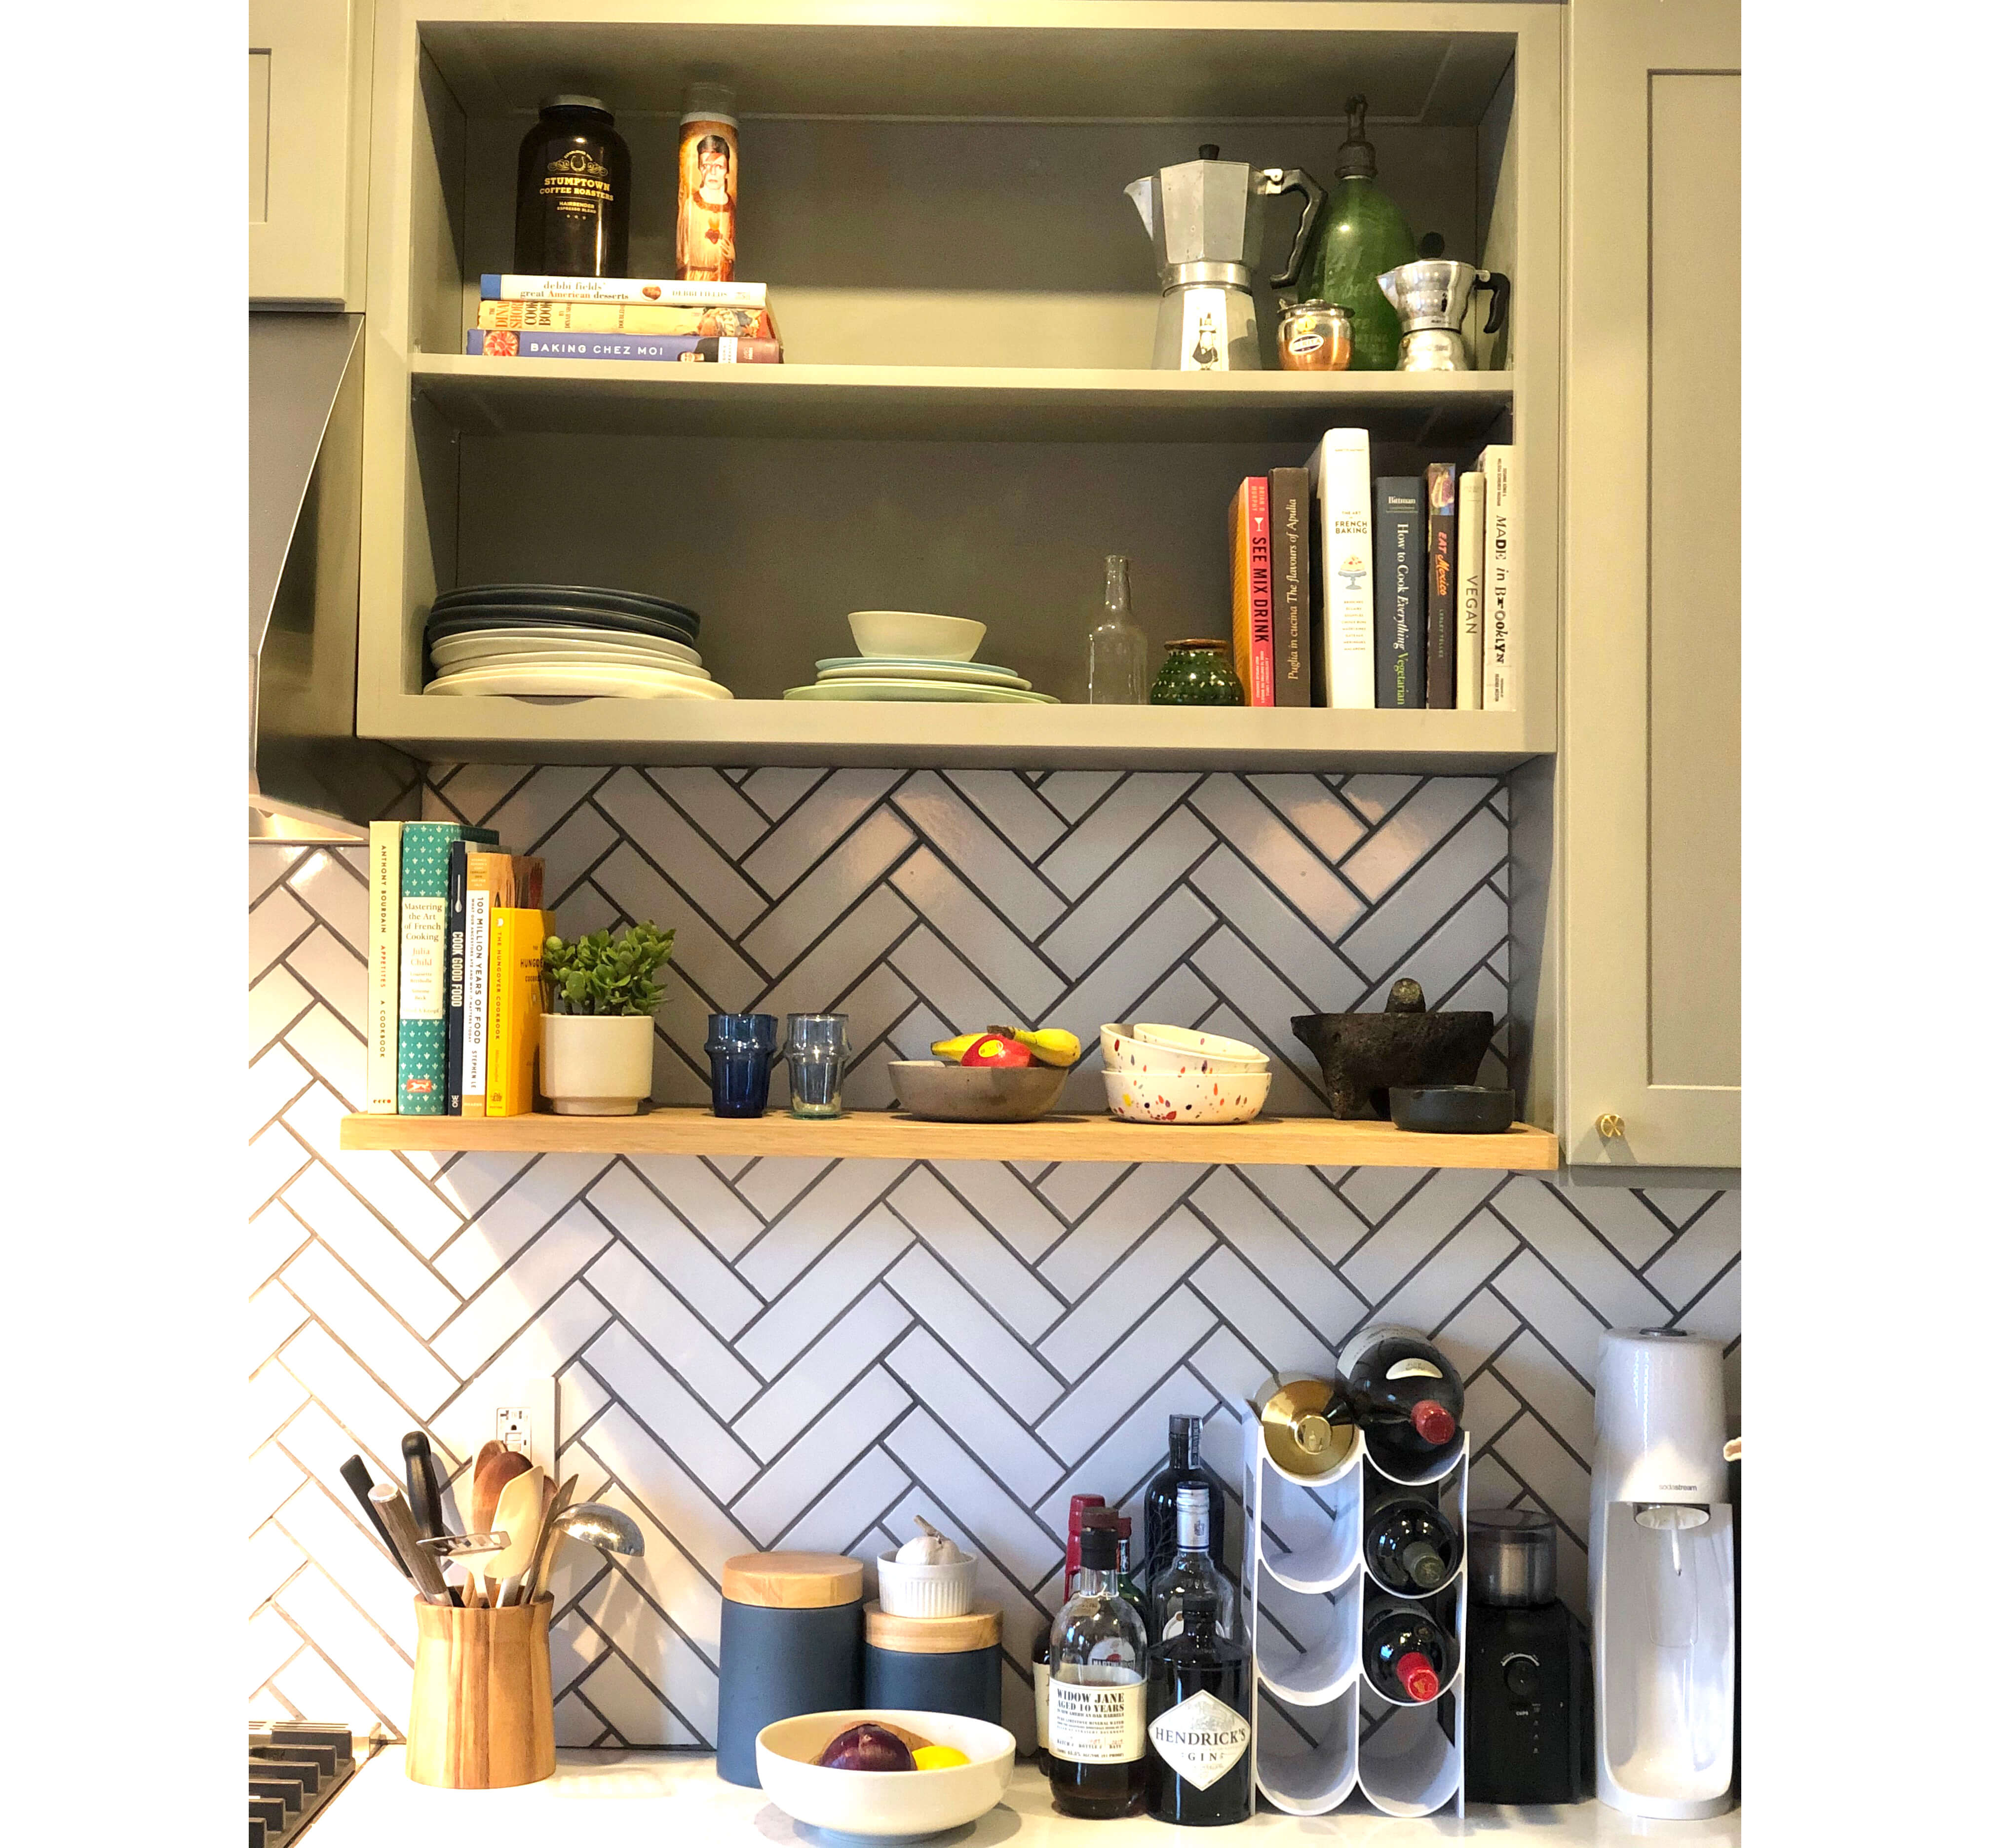
Get Creative With Standard Cabinetry
We really wanted to incorporate some open shelving. Custom millwork was just not in the cards for us. We went with all standard cabinetry. To accomplish an open cabinet look we got a cabinet finished on the inside, turned it on its side, and left the doors off. We wanted a natural wood element as well so we left room for a floating wooden shelf. We love the way it turned out. It looks custom but for a fraction of the cost.
Upgrade Your Hardware and Doors
We used prefinished and preassembled cabinets. Our cabinets are real wood but we got them inexpensively. We used the RTA Cabinet Store. We elevated them by upgrading the hardware. The hardware we went with adds some bling and we also mixed and matched styles on different cabinets for more interest. It’s also possible to get lower priced cabinet boxes without doors from IKEA and upgrade them using doors from a company like Semihandmade.

Use Stone Remnants
One of the other big expenses in the kitchen can be counters. It’s also where you can really establish a higher end look. While we worked with an amazing stone company for our kitchen counters, we learned that going to a local stone fabricator and browsing through the remnants they have from other jobs is a great way to save. We did that for every other piece of stone in our place and can easily see it paying off big in the kitchen. You can get a really high-end marble, quartz or other natural stone for a fraction of the cost. If the remnant isn’t large enough for all of your counters consider doing something different on an island.
There are ways to save on almost everything you’ll need for any renovation. These are just some things we thought of to drastically reduce the cost of finishes in a kitchen. Let us know if you have any other ideas.
[Photos by David Sauerhoff via Brownstone Boys unless noted otherwise]
Related Stories
- Brownstone Boys: Sorting Through Kitchen Counter Options
- Brownstone Boys: Kitchen Week!
- Brownstone Boys Reno Conundrum: What’s More Important, the Kitchen or a Powder Room?
Email tips@brownstoner.com with further comments, questions or tips. Follow Brownstoner on Twitter and Instagram, and like us on Facebook.


What's Your Take? Leave a Comment